Do you have a great idea or message that you want to share with your friends, family, clients, associates or audience via the web, email, social networks or by podcast? Do you have a microphone built in to your computer? How about one that plugs in by USB or 1/8″ headphone jack?
If so, you are just moments away from publishing rich and dynamic audio to your online communities, lists, hideouts or establishments.
AudioAcrobat allows you to accomplish all this and more with just three items:
1) computer
2) computer microphone
3) internet connection
As mentioned above, if you have either an USB microphone or one that connects via 1/8″ headphone jack, you can use your internet connection and AudioAcrobat account to record live onto the web for quick sharing and distribution.
However, if you do not already have a computer microphone in your possession, you may be wondering … “which brand and model should I purchase?”
While there is a large variety of selections in the spectrum of computer microphones, we’ve found a trend that has produced quality results for our members … without taking them to the bank in doing so.
Recommended Hardware
 There are (2) brands of computer microphones which come highly recommended from the AudioAcrobat staff — Plantronics and Logitech.
Both of these brands have proven time and again that they are committed to delivering quality products for both professional and semi-professional audio enthusiasts at affordable prices.
Most importantly for today’s posting, both of these brands produce microphones that are of the headset variety (see image to the right), which offer the user a hands-free experience, while placing the microphone directly in line with the users flow of speech; no matter which way the user may turn their head throughout the recording.
This style of microphone is quite popular among our members and is strongly recommended for improving both the quality of your telephone and computer microphone recordings.
Quick Steps:
1. Login to your AudioAcrobat account
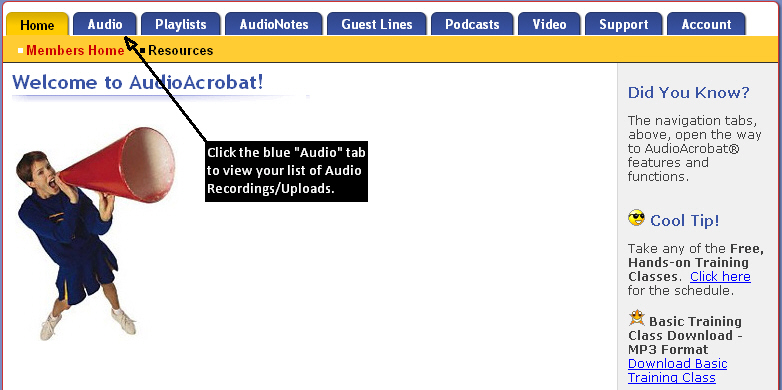
2. Click the blue “Audio” tab
3. Click “Create New Audio”
4. Click “Audio Web Recorder”
Expanded Steps:
Login to your AudioAcrobat account
Click the blue “Audio” tab
Click “Create New Audio”
If this is your first time using AudioAcrobat’s Audio Web Recorder or if you haven’t already chosen to save your Adobe Flash Player privacy settings, you will see something that looks very similar to this box:

Click “Allow” and you will then see the “Begin” button.
We will also show you how to save your preference for this selection, which will prevent this step from entering the process during future recordings.
Click “Begin” to move to the next step and begin recording.
![]()
At this time you will want to make sure that your microphone is properly configured, in which you can simply click the “Configure Microphone” button to the left.

You will then be able to select the device you wish to record from by using the drop-down that will appear in the pop-up window as seen below:

Hint: When the correct device is selected, and while speaking into the device, you’ll see the green/yellow/red bars fluctuate with the inflection of each sound that passes through the microphone to your account.
If you want to save your privacy setting preferences (“Allow“), you can do so by placing a check in the “Remember” box and saving your settings by clicking “Close“.

Now that the settings are saved and you have seen the meter respond to your voice, you can press the “Record” button at any time to begin recording.
As you record, you will see the waveform of your voice fill the space between the “Position” and “Length” markers, which will both be advancing with your recording in real-time.
![]()
Note: You have up to (1) hour to make your recording, and there is no limit to the amount of recordings you can create/store in your account.
Want to review your work before you save? Click the “Play” button for real-time review.
![]()
Before you save, you have the option to enter a title and description for your recording.
If you don’t wish to enter any information at this time, not to worry — it can be added/modified later from within your account by clicking the “Audio” tab to view your list of videos, clicking the title of your audio (“Saved PC Microphone Recording” if no title was previously specified) and choosing “Edit Description“.
If you’re ready to save and encode/optimize for streaming on the web, simply press the “Save” button at the bottom of the page or click “Cancel” to leave the recording session.

Pretty easy, huh? What’s that … you still don’t believe us? Give it a try yourself by signing up for a 30 day Free Trial. Already have an account? Login here.
Coming up next … Recording by Phone: Personal Recordings!


