
While many of our previous Audacity tutorials have been overtly simple, straight-forward and use no more than minimal algebraic equations, this one (and this one) may require an extra ounce or two of brain power to fully take advantage of. Even our senior staff members had to mull it over once or twice before truly understanding the full potential of this useful effect.
It’s not brain surgery, but in today’s post we walk our readers through the process of using our favorite free, open source audio editing software for Mac OS X, aka Audacity to apply Tempo changes without changing Pitch, and applying Pitch changes without changing Tempo … or both of them at the same time!
Gone a bit cross-eyed? We did too at first, but never fear, we will turn you into a pro in just a couple minutes!
Before starting: Looking for Setup instructions? Our recent Audacity 2.0.0 for Mac OS X Installation Tutorial should do the trick!
For today’s walk-through, we’ll be applying the Sliding Time Scale/Pitch Shift effect using Audacity 2.0.0 for Mac OS X.
Step 1: MP3 Download
Already have your file ready to go on your desktop? Skip to Step 2!
Before one can edit their AudioAcrobat recording in Audacity, the first step is to make sure that the file resides on the hard drive of the computer on which editing will be performed.
1. Login to your AudioAcrobat account
2. Click Audio (L)
3. Click the Title of the Audio you wish to Download
4. Click Download Audio
Looking for Expanded Steps? Try HERE.
Step 2: Open in Audacity
Now that the file our readers wish to edit is on their computer’s hard drive, they will want to open the file with Audacity. Right-click the file and choose Open With and select Audacity from the list. Don’t see it listed? Open Audacity from Applications folder in the Dock. Open the software and click File >> Open, selecting the audio to be edited.
Once the file opens in Audacity, our readers will see something like this:
New: Listen to the above clip!
Step 3: Highlight, Time Scale + Export
This part is really simple. Click and drag with the mouse cursor over the area you want to apply the effect, or for those keyboard enthusiasts out there, use Shift + Left / Right arrow keys to make your selection.
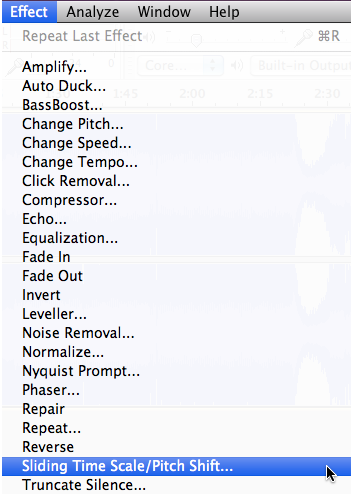
For the Sliding Time Scale/Pitch Shift effect, our readers will want to select Effect >> Sliding Time Scale/Pitch Shift as seen below:
Immediately after selecting Sliding Time Scale/Pitch Shift, the following pop-up window will appear:
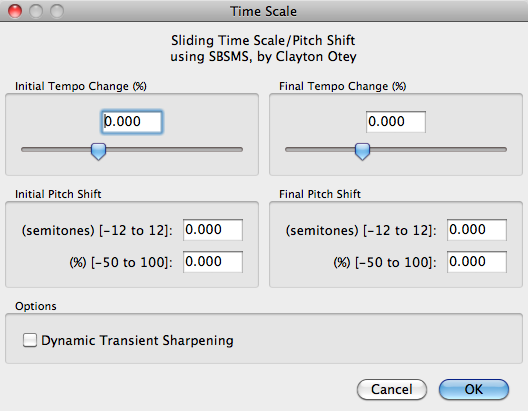
This is where the brain power comes in. Let’s let the Audacity manual do it’s best to sum this up, shall we?
This effect allows you to make a continuous change to the tempo and/or pitch of a selection by choosing initial and/or final change values.
Tempo changes made without selecting a pitch change preserve the original pitch, and pitch changes made without selecting a tempo change preserve the original tempo. By changing only one of tempo and pitch and choosing the same initial and final value, you can use Sliding Time Scale / Pitch Shift in the same way as Change Tempo or Change Pitch to produce a high quality fixed change. However Sliding Time Scale / Pitch Shift lets you for example set the initial tempo change to -50% while also setting the final tempo change to +20%, the initial pitch change to +3 semitones and the final pitch change to +1 semitones.
Because of the high quality algorithm used, Sliding Time Scale / Pitch Shift is normally slower compared to performing the same effect with Change Tempo or Change Pitch.
Time Tracks can be used to bend tempo more flexibly (also affecting pitch) using Envelope Tool.
Current Audacity now has an alternative time stretch effect called Sliding Time Scale/Pitch Shift. This uses an alternative time stretching library known as “Subband Sinusoidal Modeling” (sbsms). Sliding Time Scale / Pitch Shift allows you to change tempo (without changing pitch) while simultaneously changing pitch (without changing tempo). It can also set a different tempo or pitch change value for the start and end of the audio. Artifacts are still expected at more extreme settings, although no length changes arise from changing pitch, and changing tempo should not result in removed content or silences at the end of the selection. Note: this effect is several times slower than SoundTouch and might not work properly on low-powered machines.
Well, it looks good on paper the screen…but let’s try some extremes to see what this baby can really do, shall we?!
Test 1: Tempo
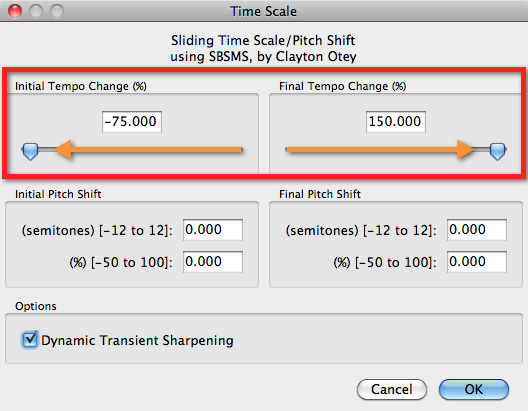
Comparing the above screenshot to the original, we see that the Initial and Final Tempo sliders have been moved all the way left, and all the way right, respectively. From this step, select OK to confirm changes.
Looking at the waveform below, we can see a large change in Tempo, starting very slow (-75%) and increasing to 1.5x time (+150%). Listening to the audio, we confirm what our eyes told us and also hear that the Pitch has not been changed, despite the large range of Tempo…which is awesome!
New: Listen to the above clip!
Test 2: Pitch
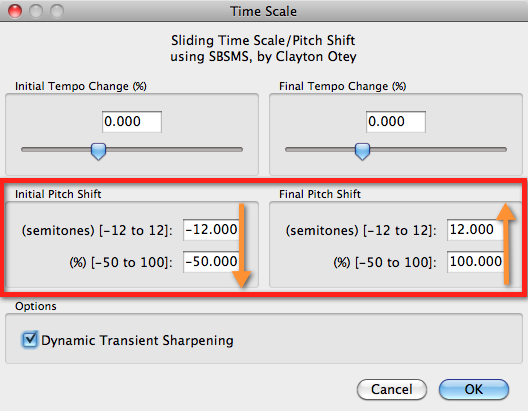
Comparing this screenshot to the original, we see that the Initial and Final Pitch values have been moved to -50% and +100%, respectively. From here, select OK to confirm changes.
Looking at the waveform below, we don’t see very much of a change from our original, which is a good thing, as the only thing changing would be Pitch, as opposed to the previous example’s Tempo change.
Listening to the audio, we do hear a BIG difference as the low beginning of the beat steadily pumps along, winding up to a high-pitched finish!
New: Listen to the above clip!
Test 3: Tempo + Pitch
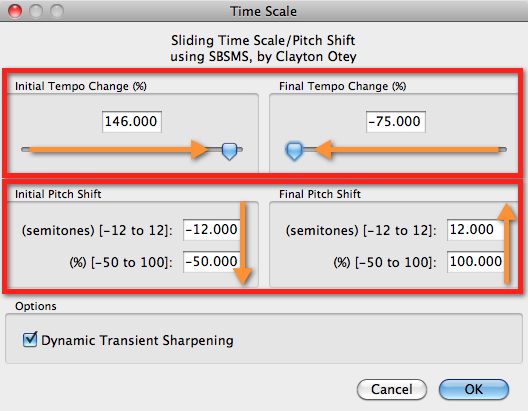
Looking at the above combination of tempo and pitch change (tempo switched from Test 1 and pitch carried over from Test 2), we are able to come up with a somewhat predictable outcome:
We should see and hear a fast start with a low pitch, gradually changing to a slow ending with a high pitch. Here’s what the waveform looks like (just as we predicted):
New: Listen to the above clip!
Aside: Notice how all (3) tests were the exact same length as the original (00:19)? This is not by coincidence, it is by design. While this useful effect outlined today allows for a great deal of change to the sonic quality of your audio, it does not mean you must compromise the audio’s duration…woo ha!
When satisfied, select File >> Export to save the newly edited version and head over to AudioAcrobat in an internet browser to begin the upload process.
Well that was quick … we’ve already walked through the process of downloading/opening our file, applying the Sliding Time Scale/Pitch Shift effect using Audacity 2.0.0 for Mac OS X and exporting the file for upload to the Web … and yet it seems as though we had just begun. If you agree, go ahead and click the ‘Previous Post’ link beneath this article to continue the joyride!
Did you get stopped somewhere in the process? Make sure you have LAME correctly setup then shampoo, rinse and repeat the steps listed above. Success will be yours!
Did you find the above process helpful? Were you able to follow-along? Please let us know by leaving a comment below!
Comment below and connect with us for daily updates!
- Follow AudioAcrobat on Twitter
- Become a fan on Facebook
- Join our group on LinkedIn
- Subscribe to AudioAcrobat RSS
Want to learn more about AudioAcrobat? Go ahead, give it a try yourself by signing up for a 30 day Free Trial or join one of our FREE Training Classes without signing up for squat. Already have an account? Login HERE.
Did you know that AudioAcrobat has a built-in affiliate referral program? Earn 33% commissions, monthly!
Coming up next … #FolowFriday!


[…] last week’s eye-crossing tempo + pitch changes, we are pleased to offer an Audacity tutorial that is beyond simple to […]