If you’ve ever recorded an audio that had extremely quiet spots and conversely loud peaks, you may have pondered the reduction of distance between both ends of the aural spectrum to bring these extremes closer to one another.
In today’s post we will walk our readers through the process of using our favorite free, open source audio editing software for PC, aka Audacity to bring down the highs, raise the lows and even remove DC bias in just a couple of clicks.
Looking for Setup instructions? Our recent Audacity 2.0.0 for Windows Installation Tutorial should do the trick!
For today’s walk-through, we’ll be applying the Normalize effect using Audacity 2.0.0 (Windows 7) as run on Parallels; a virtual machine booted in ‘coherence mode’ running on a MacBook Pro.
Step 1: MP3 Download
Before one can edit their AudioAcrobat recording in Audacity, the first step is to make sure that the file resides on the hard drive of the computer on which editing will be performed.
1. Login to your AudioAcrobat account
2. Click Audio (L)
3. Click the Title of the Audio you wish to Download
4. Click Download Audio
Looking for Expanded Steps? Try HERE.
Step 2: Open in Audacity
Now that the file our readers wish to edit is on their computer’s hard drive, they will want to open the file with Audacity. Right-click the file and choose Open With and select Audacity from the list. Don’t see it listed? Open Audacity from Programs folder in the Start menu. Open the software and click File >> Open, selecting the audio to be edited.
Once the file opens in Audacity, our readers will see something like this:
Step 3: Highlight, Normalize + Export
It really is that simple. Click and drag with the mouse cursor or for those keyboard enthusiasts out there use Shift + Left / Right arrow keys to make a selection.
For the Normalize effect, our readers will want to make sure to select the area which encompasses the intended duration for which the effect is to be applied.
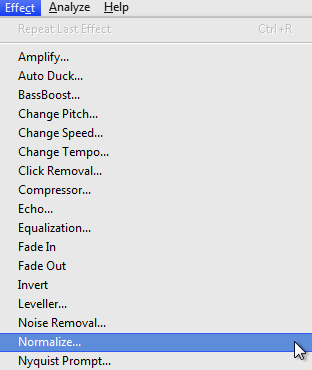
Here our readers will want to select Effect >> Normalize as seen below:

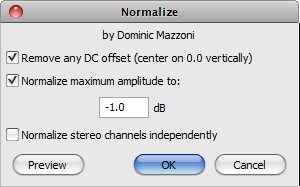
Immediately after selecting the Normalize effect, the following pop-up window will appear:

To best explain what exactly these settings represent, we’d like to share an excerpt from the Audacity manual regarding the Normalize effect:
Use the Normalize effect to set the peak amplitude of single or multiple tracks, equalize the peak amplitude of the left and right channels of stereo tracks and optionally remove any DC offset from the tracks.
Click the Preview button to preview your equalization in real-time. Try adjusting the default negative value in the Normalize Maximum Amplitude To: box and Preview your changes.
Select OK to confirm your selection and Audacity will immediately render the effect.
Here’s what our waveform looks like after entering a value of ‘-5dB’ (below). See the difference?
When satisfied, select File >> Export to save the newly edited version and head over to AudioAcrobat in an internet browser to begin the upload process.
Well that was quick … we’ve already walked through the process of downloading and opening our file, applying the Normalize effect using Audacity 2.0.0 for Windows 7 and exporting the file for upload to the Web … and yet it seems as though we had just begun. If you agree, go ahead and click the ‘Previous Post’ link beneath this article to continue the joyride!
Did you get stopped somewhere in the process? Make sure you have LAME correctly setup then shampoo, rinse and repeat the steps listed above. Success will be yours!
Did you find the above process helpful? Were you able to follow-along? Please let us know by leaving a comment below!
Connect with us for daily updates!
- Follow AudioAcrobat on Twitter
- Become a fan on Facebook
- Join our group on LinkedIn
- Subscribe to AudioAcrobat RSS
Want to learn more about AudioAcrobat? Go ahead, give it a try yourself by signing up for a 30 day Free Trial or join one of our FREE Training Classes without signing up for squat. Already have an account? Login HERE.
Did you know that AudioAcrobat has a built-in affiliate referral program? Earn 33% commissions, monthly!
Coming up next … #FolowFriday!