While the phrase “Nobody’s Perfect” might apply to humans, animals or possibly even make-believe friends, the term can also be adapted to things that aren’t quite, oh what’s the word … visible? Yes, things that can’t be seen, like audio, can often times be sub-par, if you will.
In today’s post, we will walk through the steps of using our favorite free, open-source audio editing software (Audacity) to fine-tune the bass, mid-range and highs of your audio through the application of an Equalization effect.
Looking for Setup instructions? We’ve got you covered! Our recent Audacity for Mac OS X Installation Tutorial includes setting up LAME as well!
For today’s walk-through, we’ll be applying the Equalization effect using Audacity 1.3 Beta (Unicode) for Mac OS X.
Step 1: MP3 Download
Before one can edit their AudioAcrobat recording in Audacity, the first step is to make sure that the file resides on the hard drive of the computer on which editing will be performed.
1. Login to your AudioAcrobat account
2. Click Audio (L)
3. Click the Title of the Audio you wish to Download
4. Click Download Audio
Looking for Expanded Steps? Try HERE.
Step 2: Open in Audacity
Now that the file our readers wish to edit is on their computer’s hard drive, they will want to open the file with Audacity. Right-click the file and choose Open With and select Audacity from the list. Don’t see it listed? Open Audacity from the Applications folder in the Dock. Open the software and click File >> Open, selecting the audio to be edited.
Once the file opens in Audacity, our readers will see something like this:
Step 3: Highlight, Equalization + Export
It really is that simple. Click and drag with the mouse cursor or for those keyboard enthusiasts out there use Shift + Left / Right arrow keys to make a selection.
For the Equalization effect, our readers will want to make sure to select the area which encompasses the intended duration of which the effect is to be applied.
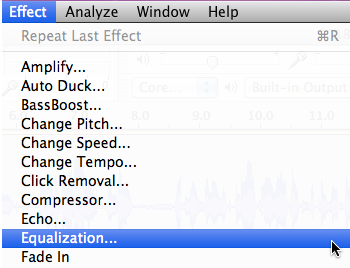
Here our readers will want to select Effect >> Equalization as seen below:

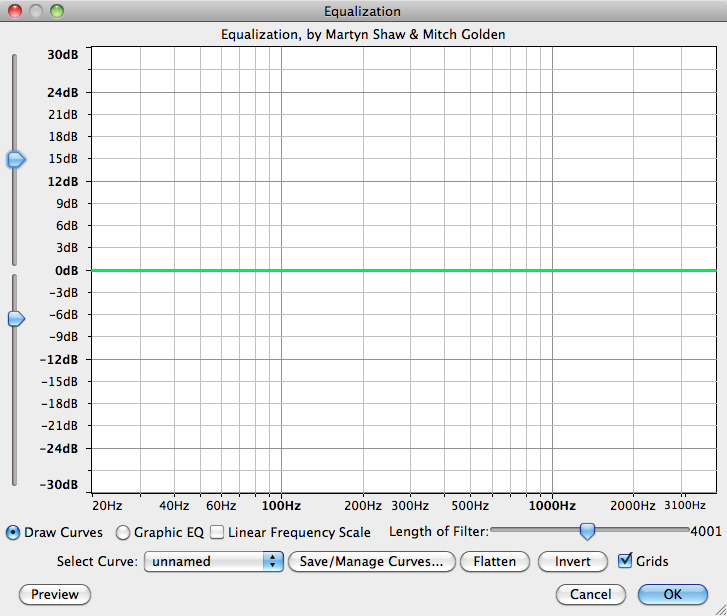
Immediately after selecting the Equalization effect, the following pop-up window will appear:
If you’re not already familiar with the range of frequencies seen above (20Hz – 4000Hz), anything left of center affects the ‘low end’ aka ‘bass’ frequencies. Anything to the right of center affects the ‘high end’ aka ‘treble’ frequencies. As you may have guessed, anything found near the center will affect mid range frequencies aka ‘mids’.
By default, the Draw Curves option is selected and we are able to click on the blue line to add handle points, which in turn can be clicked and dragged vertically or horizontally along the axes seen above. A higher vertical positioning would be considered a ‘boost’, while lower vertical positioning will decrease the frequency’s perceived volume by the listener.
If you require a ‘zoomed in’ or ‘zoomed out’ view of the grid, the sliders found along the left side of this pop-up will allow for just that.

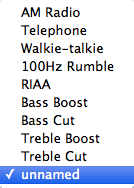
There are several preset curves built-in to the default Audacity installation, all of which can be accessed through the Select Curve drop-down menu. Click on various options such as Bass Boost, Bass Cut, Treble Boost and Treble Cut to see how the blue line (Curve) changes based on your selection.
![]()
Should you come up with your own custom Curve that you’d like to save as a preset (like the others included in the Select Curve drop-down menu), the Save/Manage Curves button will allow you to do just that. Click Flatten to restore the curve to its default setting and click Invert to flip anything above/below 0dB.
Click the Preview button to preview your equalization in real-time. Select OK to confirm your selection and Audacity will immediately render the effect.
When satisfied, select File >> Export to save the newly edited version and head over to AudioAcrobat in an internet browser to begin the upload process.
Well that was quick … we’ve already walked through the process of downloading and opening our file, applying an Equalization effect using Audacity for Mac OS X and exporting the file for upload to the Web … and yet it seems as though we had just begun. If you agree, go ahead and click the ‘Previous Post’ link beneath this article to continue the joyride!
Did you get stopped somewhere in the process? Make sure you have LAME correctly setup then shampoo, rinse and repeat the steps listed above. Success will be yours!
Comment below and connect with us for daily updates!
- Follow AudioAcrobat on Twitter
- Become a fan on Facebook
- Join our group on LinkedIn
- Subscribe to AudioAcrobat RSS
Want to learn more about AudioAcrobat? Go ahead, give it a try yourself by signing up for a 30 day Free Trial or join one of our FREE Training Classes without signing up for squat. Already have an account? Login HERE.
Did you know that AudioAcrobat has a built-in affiliate referral program? Earn 33% commissions, monthly!
Coming up next … #FolowFriday!
