Hey Mac users! Does your audio sound like the person speaking was at one end of a tunnel and the microphone was at the opposite end? Do the juxtaposition of large peaks and shallow valleys in your audio waveform clip or distort when applying a Volume or Gain increase?
Not to fear, as here we will walk through the steps of using our favorite free, open-source audio editing software (Audacity) to help increase the RMS level of your audio waveform aka how loud the audio sounds, without degrading the Noise Floor or clipping the highs, through the application of a Compressor effect.
Looking for Setup instructions? We’ve got you covered! Our recent Audacity for Mac OS X Installation Tutorial includes setting up LAME as well!
For today’s walk-through, we’ll be applying the Compressor effect using Audacity 1.3 Beta (Unicode) for Mac OS X.
Step 1: MP3 Download
Before one can edit their AudioAcrobat recording in Audacity, the first step is to make sure that the file resides on the hard drive of the computer on which editing will be performed.
1. Login to your AudioAcrobat account
2. Click Audio (L)
3. Click the Title of the Audio you wish to Download
4. Click Download Audio
Looking for Expanded Steps? Try HERE.
Step 2: Open in Audacity
Now that the file our readers wish to edit is on their computer’s hard drive, they will want to open the file with Audacity. Right-click the file and choose Open With and select Audacity from the list. Don’t see it listed? Open Audacity from the Applications folder in the dock. Open the software and click File >> Open, selecting the audio to be edited.
Once the file opens in Audacity, our readers will see something like this:
Step 3: Highlight, Compressor + Export
It really is that simple. Click and drag with the mouse cursor or for those keyboard enthusiasts out there use Shift + Left / Right arrow keys to make a selection.
For the Compressor effect, our readers will want to make sure to select the area which encompasses the intended duration for which the effect is to be applied.
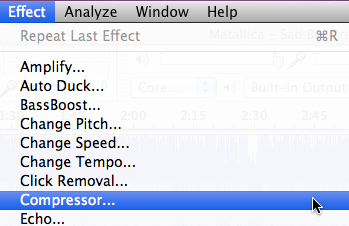
Here our readers will want to select Effect >> Compressor as seen below:

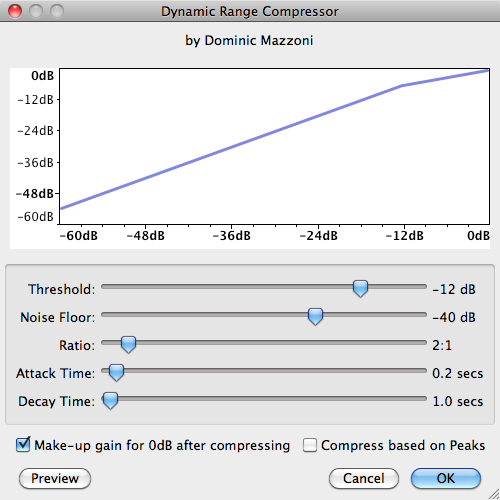
Immediately after selecting the Compressor effect, the following pop-up window will appear:

In today’s post, we played with each of the settings and applied the Compressor effect several times to achieve our goal of boosting the lows without sending them into the distorted land of clipping. The outcome will depend on the area selected and levels prior to applying the effect, along with any settings chosen in this popup window.
All modifications using the Threshold, Noise Floor, Ratio, Attack and Decay Time sliders, along with the Make-up gain for 0dB after compressing and Compress based on Peaks check boxes can be sampled before committing using the Preview button. Select OK to confirm the settings and apply the effect.
For a truly great break-down of what action each slider / check box provides, we recommend checking out the Audacity wiki HERE.
Looking at our final product, we see several quieter areas boosted, without clipping; which offers a much louder-sounding audio overall:
When satisfied, select File >> Export to save the newly edited version and head over to AudioAcrobat in an internet browser to begin the upload process.
Well that was quick … we’ve already walked through the process of downloading and opening our file, applying a Compressor effect using Audacity for Mac OS X and exporting the file for upload to the Web … and yet it seems as though we had just begun. If you agree, go ahead and click the ‘Previous Post’ link beneath this article to continue the joyride!
Did you get stopped somewhere in the process? Make sure you have LAME correctly setup then shampoo, rinse and repeat the steps listed above. Success will be yours!
Connect with us for daily updates!
- Follow AudioAcrobat on Twitter
- Become a fan on Facebook
- Join our group on LinkedIn
- Subscribe to AudioAcrobat RSS
Want to learn more about AudioAcrobat? Go ahead, give it a try yourself by signing up for a 30 day Free Trial or join one of our FREE Training Classes without signing up for squat. Already have an account? Login HERE.
Did you know that AudioAcrobat has a built-in affiliate referral program? Earn 33% commissions, monthly!
Coming up next … #FolowFriday!


I don’t know why the title of this post refers to Mac OSX, since everything here also applies to the Windows version of Audacity.
Much of what is written here is almost identical with the Audacity wiki on compression. There, and here, we are not shown the different settings and how they have affected the outcome, only shown the compressed waveform.
There’s a useful video tutorial on using compression at http://youtu.be/waMVJYCxGmg.
Thanks for your feedback Karl!
We did see that there was a reference to the ‘Start Menu’ in our post (an obvious Windows reference) and have updated this to reflect the ‘Applications’ folder on the ‘Dock’ to coincide with this post being written specifically for Mac OS X users.
As we, like many other sites, do reference the Audacity Wiki, we believe that it is a great resource for identifying specific terms related to the effects included in the software; but we’d like to point out that nothing is ‘identical’, as we are not plagiarizing their manual nor trying to set Google’s ‘Panda’ loose on both of our sites (re: duplicate content).
In the video you’ve linked to, we are seeing a very brief (and quite similar) approach to the effect outlined in our post. Perhaps yourself and our other readers would prefer the medium of video instead of textual content?
Please let us know how you’d like to see this and future effects broken down … and we’ll be happy to oblige!
Cheers!
Brian & AudioAcrobat